Contacts
Contacts is your team's shared address book for every external phone number your business interacts with. Add names, companies, tags, and notes to phone numbers so your whole team knows who's calling before they pick up. Assign contacts to specific team members or groups, set priorities, and keep your full communication history with each contact in one place.
Every contact has a timeline that pulls together every call, text message, and internal note involving that phone number. No digging through call logs, chat threads, and sticky notes to piece together what happened with a customer - it's all on one screen, in order. Your whole team contributes to the same timeline, so when a customer calls back, whoever picks up has the full picture.
Go to Contacts in the sidebar to open your contact list.
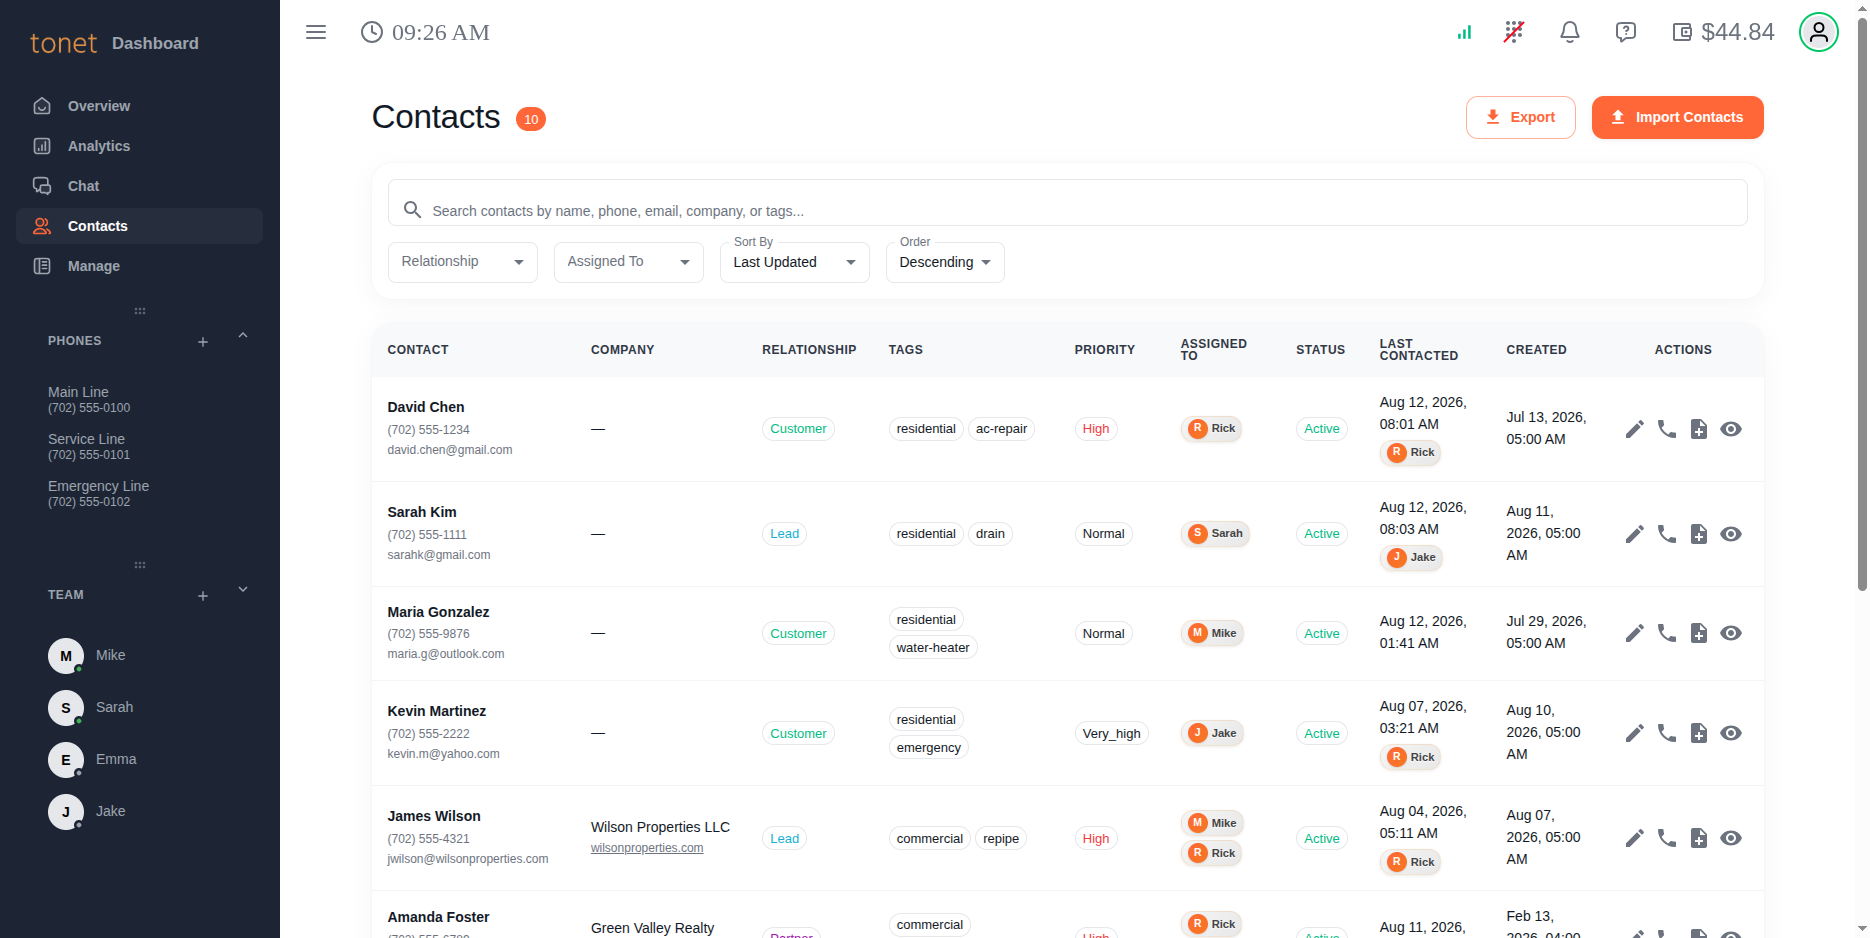
Contact List
The main table shows all your contacts with the following columns:
| Column | Description |
|---|---|
| Contact | Name, phone number, and email |
| Company | Company name and website |
| Relationship | Customer, Lead, Vendor, or Partner |
| Tags | Custom labels for organizing contacts |
| Priority | Very Low, Low, Normal, High, or Very High |
| Assigned To | Which users or groups are responsible for this contact |
| Status | Active or Blocked |
| Last Contacted | Date of the most recent call with this number and which team member handled it |
| Created | When the contact was first added |
| Actions | Edit, Call, Add Note, View Details |
Search and Filters
Use the toolbar above the table to narrow down your contact list:
- Search - Find contacts by name, phone number, email, company, or tags
- Relationship - Filter by Customer, Lead, Vendor, or Partner
- Assigned To - Filter by one or more team members or groups
- Sort By - Last Updated, Date Created, Name, or Company
- Order - Ascending or Descending
Click Clear Filters to reset everything.
Quick Actions
Each contact row has four action buttons:
- Edit - Opens the contact editor sidebar on the right
- Call - Starts a call to this number directly from your browser using the dialpad
- Add Note - Opens the contact detail page with the note input focused
- View Details - Opens the full contact detail page with the communication timeline
Editing a Contact
Click the Edit button on any contact row to open the editor sidebar. You can set:
- Name - Contact's name
- Email - Email address
- Company - Company name
- Address - Physical address
- Website - Company website URL
- Tags - Custom labels. Type and press Enter to add new tags, or pick from existing ones already used in your contacts. Use tags to organize contacts however makes sense for your business (e.g. "vip", "residential", "commercial", "referral").
- Relationship - Customer, Lead, Vendor, or Partner. You can also type a custom relationship.
- Priority - Very Low, Low, Normal, High, or Very High
- Assigned To - Check off one or more team members or groups responsible for this contact
- Block/Unblock - Block a number to flag it. Blocked contacts show a red "Blocked" status in the list.
Click Save to apply your changes or Cancel to discard them.
Contacts are keyed by phone number. You can't change a contact's phone number after creating it - if a customer gets a new number, create a new contact.
Contact Detail Page
Click View Details on any contact - or click any of your own phone numbers - to open the detail page. It has two panels: a timeline on the left and an info sidebar on the right.
Timeline
The timeline is the complete history of a phone number - every call, every text, every internal note, all in one chronological feed. When a customer calls in and says "I spoke with someone last week about a quote," any team member can pull up the number and see exactly what was discussed, who handled it, and what was promised. No digging through separate call logs, chat threads, and sticky notes.
- Calls - Every inbound and outbound call, with duration, disposition (answered, missed, busy), and which team member handled it
- Messages - SMS conversations involving this number
- Notes - Internal notes your team has added (see Adding Notes below)
- Transcripts - Call transcriptions when available
Use the filter toggles at the top to show or hide each type. Filters persist between sessions.
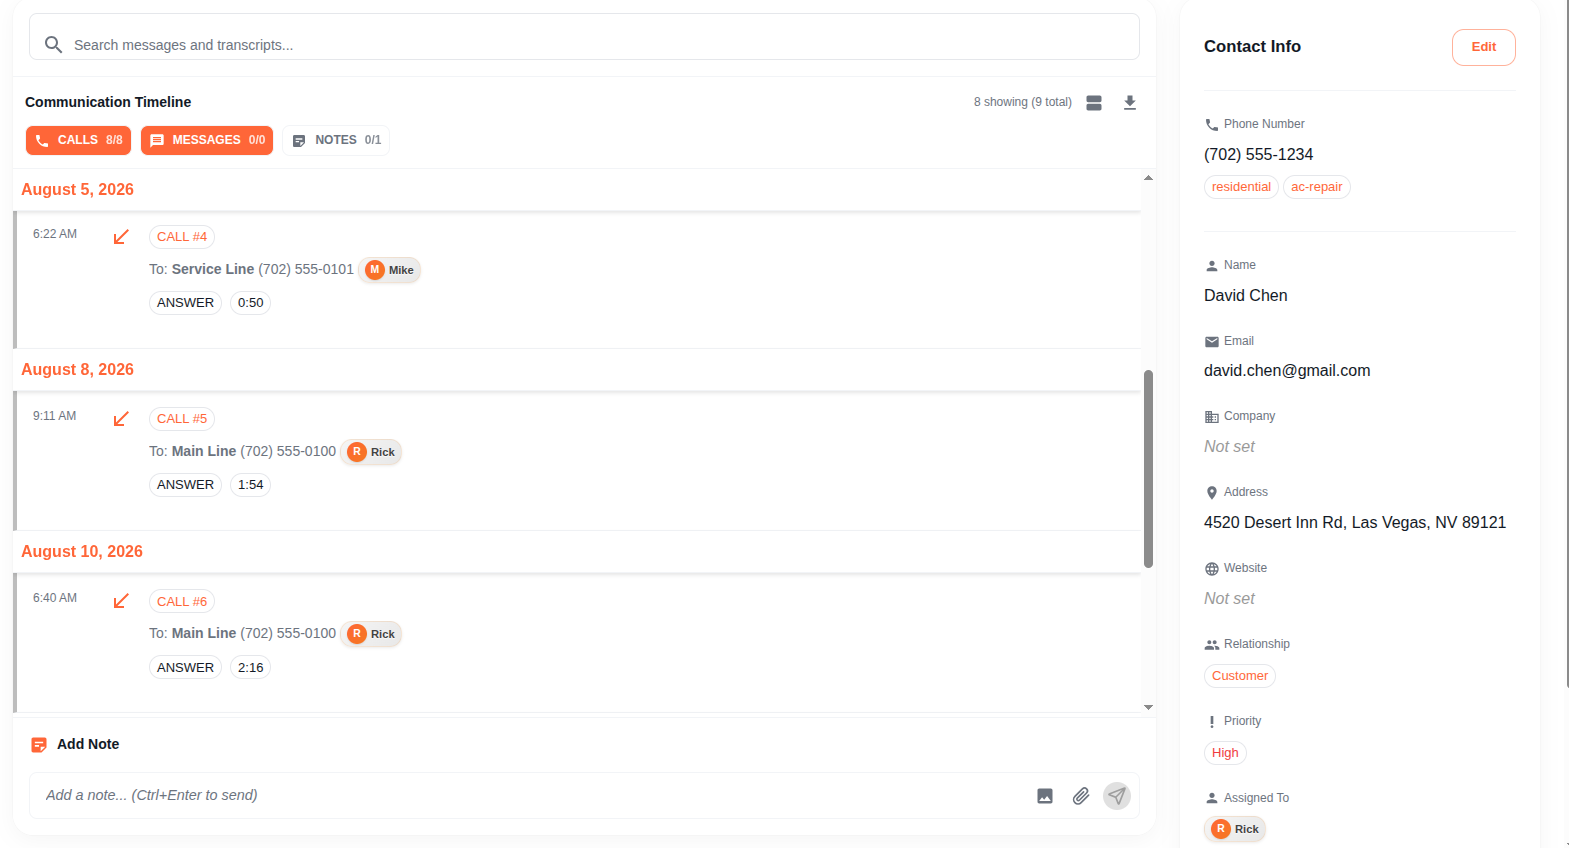
The timeline automatically pulls in data from Call History and Chat. You don't need to log anything manually - just add notes for context that isn't captured by calls and texts.
Your Phone Numbers - Phone Metrics
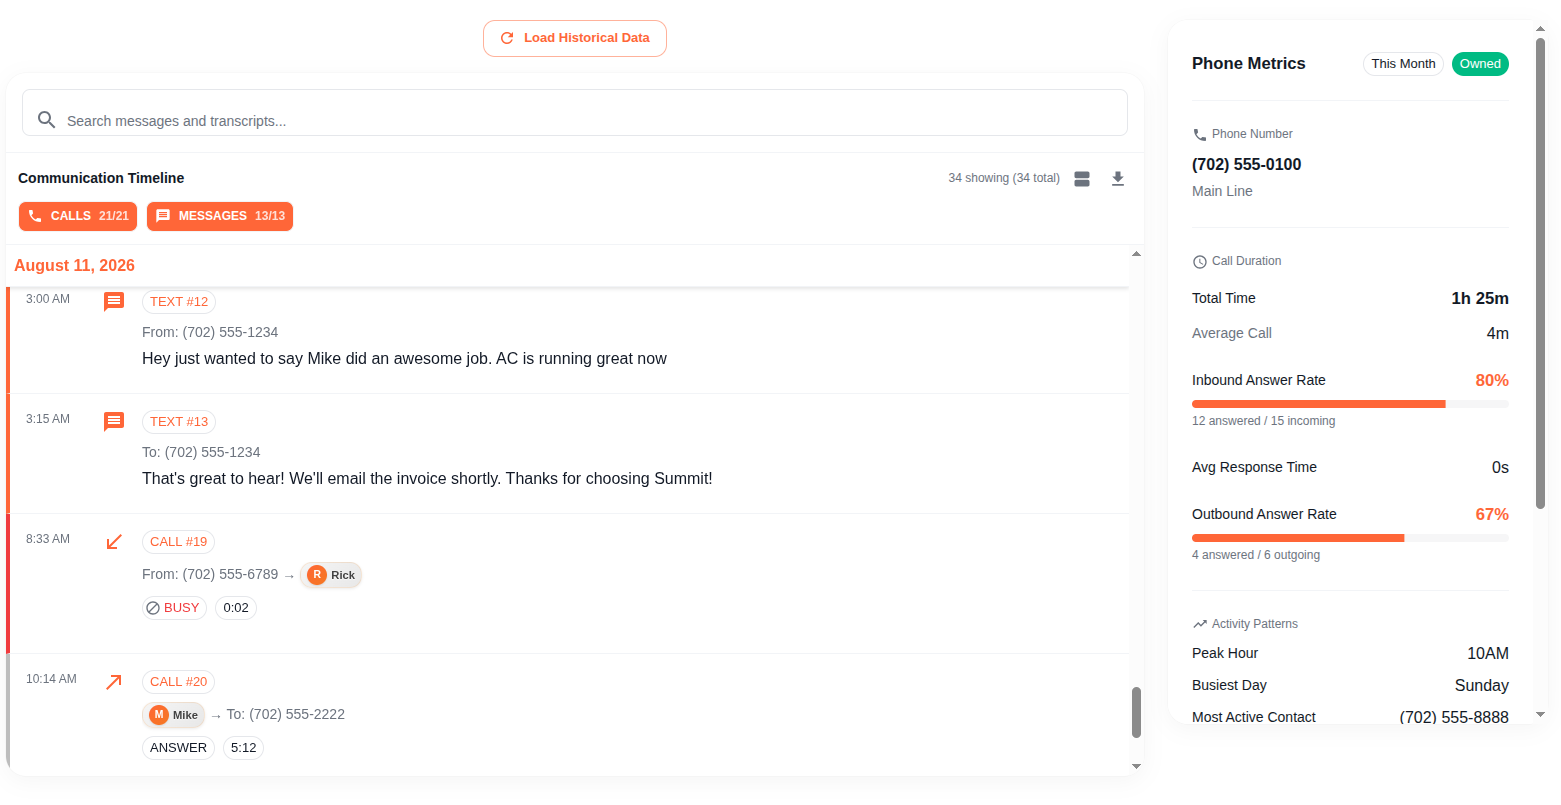
When you open one of your own Tonet phone numbers, the right sidebar shows Phone Metrics - per-number analytics that tell you exactly how that number is performing:
| Metric | What it tells you |
|---|---|
| Total / Average Call Duration | How much time is spent on calls to this number |
| Inbound Answer Rate | Percentage of incoming calls your team picks up, with answered/total count |
| Avg Response Time | How many seconds it takes your team to answer |
| Outbound Answer Rate | Percentage of outbound calls that connect |
| Peak Hour | The hour of day this number gets the most calls |
| Busiest Day | The day of the week with the most activity |
| Most Active Contact | The external number that calls or gets called the most |
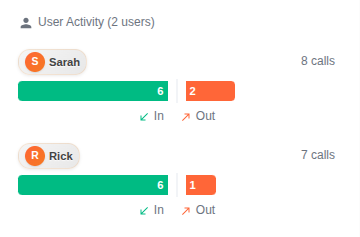
Below the metrics, a User Activity section shows each team member authorized on the number with a visual breakdown of their inbound vs outbound calls. See at a glance who's handling the most volume and whether the workload is balanced.
External Contacts - Contact Info
When you open an external phone number (not one of your own), the right sidebar shows the contact editor instead - the same fields as the edit panel on the list page.
Adding Notes
Notes are internal - your team sees them, the contact doesn't. Use them to record context that doesn't belong in a text message: what was discussed on a call, follow-up action items, customer preferences, job details.
Add a note from the contact detail page:
- Type in the note input at the bottom of the timeline
- Optionally attach files (images, documents, PDFs) using the image or file buttons
- Press Ctrl+Enter or click the send button
You can also link a note to a specific call or message in the timeline by clicking the reference button on that event. The note will show which event it relates to.
Importing Contacts
Import contacts in bulk from a CSV file. Only managers, admins, and owners can import.
- Click Import Contacts in the top right
- Drag and drop a CSV file or click to browse. You can also click Download Sample CSV to get a template.
- Review and edit contacts in the preview table before importing. Fix any warnings (missing names, invalid relationships or priorities).
- Set Bulk Operations to apply settings across all imported contacts at once:
- Assign All To - Assign every imported contact to a specific team member
- Add Tags to All - Add tags to every imported contact (comma-separated)
- Check Overwrite existing contacts if you want to update contacts that already exist (matched by phone number). Leave unchecked to skip duplicates.
- Click Import to start. A progress bar shows succeeded, failed, and remaining counts in real time.
- When complete, review the results summary. Any failures show the specific error per row.
CSV Format
| Column | Required | Description |
|---|---|---|
| phone | Yes | Phone number (10 digits, no formatting, e.g. 5551234567) |
| name | No | Contact name |
| No | Email address | |
| company | No | Company name |
| address | No | Physical address (use quotes if it contains commas) |
| website | No | Website URL |
| tags | No | Comma-separated tags within the field (e.g. customer,vip) |
| relationship | No | customer, lead, vendor, or partner |
| priority | No | low, normal, or high (defaults to normal) |
Exporting Contacts
Click Export in the top right to download all your contacts as a CSV file. The export includes all fields: phone, name, email, company, address, website, tags, relationship, priority, and assigned_to. Use this for backups or to move contacts between systems.